简易 VueRouter 使用方式
👇 测试代码( Vue2 和 VueRouter2 都通过 CDN 引入 UMD 模块化风格资源)
<html>
<head><title>MiniRouter</title></head>
<body>
  <div id="app"></div>

  <script src="https://unpkg.com/[email protected]/dist/vue.js"></script>
  <script src="https://unpkg.com/[email protected]/dist/vue-router.js"></script>

  <script>
    Vue.use(VueRouter)

    const Home = { template: '<div>home</div>' }
    const Foo = { template: '<div>foo</div>' }

    const router = new VueRouter({
      mode: 'history',
      routes: [
        { path: '/', component: Home },
        { path: '/foo', component: Foo },
      ]
    })

    new Vue({
      router,
      template: `
        <div id="app">
          <h1>VueRouter</h1>
          <ul>
            <li><router-link to="/">/home</router-link></li>
            <li><router-link to="/foo">/foo</router-link></li>
          </ul>
          <router-view class="view"></router-view>
        </div>
      `
    }).$mount('#app')
  </script>
</body>
</html>
👆 VueRouter 的生效分为了2步
new VueRouter时初始化对浏览器路由的监听逻辑- 把
vueRouter作为VuePlugin注入Vue实例时挂载的全局组件/方法
实现VueRouter 类Class的结构
👇 Vue.use(VueRouter) 对应的插件结构
❕:
install里要用到this, 所以不能用箭头函数
export default class VueRouter {

}

function install(vue) { }

VueRouter.install = install
👇 等价于
export default {
  install(vue){

  }
}
👇 简易起见, miniRouter.js 我们做成 IIFE 就行
(() => {
class VueRouter { }

VueRouter.install = function (vue) { }

window.VueRouter = VueRouter
})()
编写类的 hash/history 路由机制
如 👆, VueRouter 的生效分为了2步
这里实现 new VueRouter 时初始化对浏览器路由的监听逻辑
VueRouter 接收参数
new Router() 的时候会传入 路由mode 和 路由配置清单routes
class VueRouter {
  constructor( options ) {
    this.routes = options.routes || []
    this.mode = options.mode || 'hash'
  }
}
创建一个存放当前路由信息的 Class类
class HistoryRoute {
  constructor(){
    this.current = null // 存放当前路由路径
  }
}

class VueRouter {
  constructor( routerOptions ) {
    // ...
    this.history = new HistoryRoute() // <-- this
  }
}
👆 暂时只有一个 current 字段,存放当前路由路径
编写不同路由mode 处理浏览器路由逻辑
class VueRouter {
  constructor( options ) {
    // ...
    this.history = new HistoryRoute()

    // 不同路由mode 区分处理浏览器路由逻辑 <-- this
    if (this.mode === "hash") {
      // 先判断用户打开时有没有hash值,没有的话跳转到
      !location.hash && (location.hash = "/"); // xxx -> xxx#/

      // 监听路由变化 把路由路径存放到 history
      window.addEventListener("load",()=>{
        this.history.current = location.hash.slice(1)
      })
      window.addEventListener("hashchange",()=>{
        this.history.current = location.hash.slice(1)
      })
      return
    }

    if(this.mode === 'history') {
      !location.pathname && (location.pathname = "/");

      // 监听路由变化 把路由路径存放到 history
      window.addEventListener('load',()=>{
        this.history.current = location.pathname
      })
      window.addEventListener("popstate",()=>{
        this.history.current = location.pathname
      })
      return
    }

    console.log(`invalid mode: ${mode}`)
  }
}
👆 2种 mode 对应的逻辑,就是 重学vue-router原理 的原理
代码看起来比讲原理时简单,是因为
history时, 不做a标签的拦截默认事件hash/history监听到URL上目标页面,只用存起来,而不用像原理文章中那样操作DOM渲染页面内容
原理文章中用了 DOMContentLoaded 而不是 load
🤔 区别?TODO:
VueRouter Plugin install
👆 至此, 实现了浏览器路由监听的逻辑, 相关的路由变化和不刷新浏览器是没问题了, 但是页面没有相应渲染
接下来用 VuePlugin 机制, 往 Vue实例 上挂载功能
- 全局注册组件
<router-view>、<router-link> - 监听当前路由变化, 并匹配出相应页面组件实例(参数路由配置清单routes),进行渲染
- 往所有组件实例的this上挂载
$router和$route
VueRouter install 函数设置为单例模式
install 函数设置为 单例模式 (函数式的单例)
限制调用 Vue实例插件机制调用 install 只能调一次
function install (Vue) {
  if (install.installed) return

  install.installed = true
}
👆 这里为了简单起见, 不把这段逻辑写入, 但是需要了解有这么个单例机制
1. VueRouter install 注册全局组件
vue 的插件机制,允许我们往 Vue实例 上挂载东西
全局注册组件 <router-view>、<router-link>
😯 这也是业务代码中常用的 全局注册组件 的
Vue Plugin逻辑
// 把 `vueRouter` 作为 `VuePlugin` 注入 `Vue实例` 时挂载的全局组件/方法
VueRouter.install = function(Vue) {
   Vue.component('router-link', { render(){}} )
   Vue.component('router-view', { render(){}} )
}
👇 效果 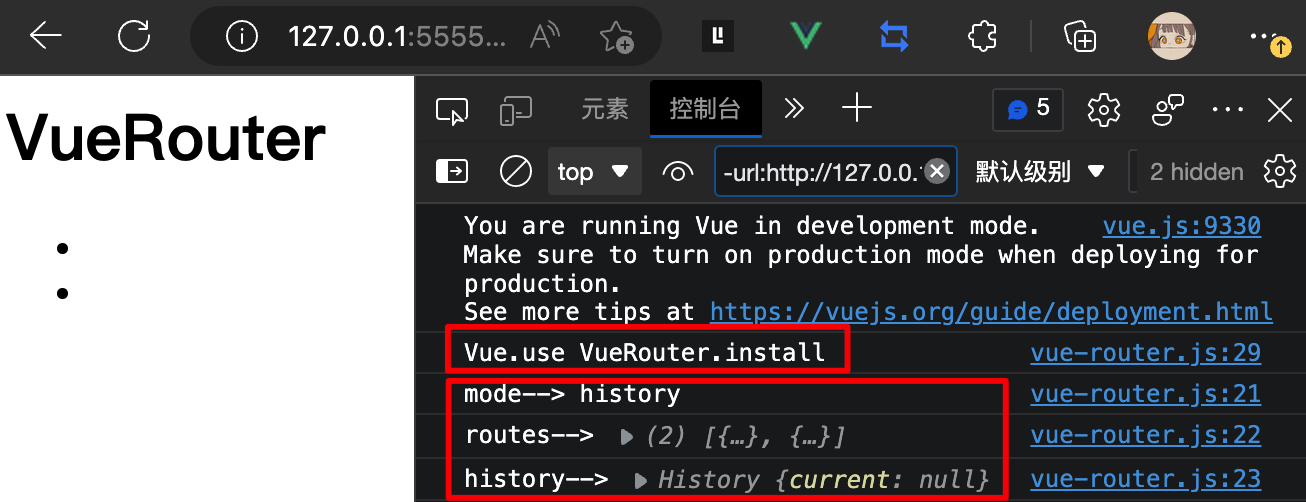
router-link
👇 这里用 函数式组件 渲染函数h
router-link 是一个带有跳转功能 a标签 或是 其他DOM
👇 这里只实现 a标签
Vue.component('router-link', {
	props:{
		to:String // 目标路由
	},
	render(h){
		// ❕ 记得 return
		return h('a', { attrs: {href: this.to} }, this.$slots.default)
	}
})
用了 a标签 跳转就要相应的处理阻止它的默认事件
和 重学vue-router原理 一样, 在 history 模式下遍历所有 a节点 阻止默认事件
if(this.mode === 'history') {
	// ...
  // 2. 当页面加载(首次访问/刷新)时 设置当前路由 history.current 的值
  window.addEventListener('load',()=>{
    this.history.current = location.pathname

    // 4. 遍历现有所有 a标签 绑定点击事件禁用原逻辑
    var linkList = document.querySelectorAll('a[href]')
    linkList.forEach(el => el.addEventListener('click', (e) => {
      e.preventDefault()
      // 5. 使用 `History API` 来跳转 `a标签` 上的 `href` 指定页面
      history.pushState(null, '', el.getAttribute('href'))
      // 调用 `history.pushState()` 或者 `history.replaceState()` 不会触发 `popstate` 事件
      this.history.current = location.pathname
    }))
  })
	// ...
}
TODO: Vue 官方没有处理? 那渲染成 a标签 不就有问题了吗?
router-view
编写 router-view 则需要该组件可以获取到 VueRouter 中的 当前路由 和 路由配置清单
根据当前路由路径匹配相应的页面组件实例, 进行渲染
但是现在这个全局注册的组件取不到实例化后的 Router
我们来想办法整这个刺头
首先 use插件 时, 还没实例化, 也就是 install 方法调用时, 只能拿到未实例化的 Router
而实例化后的 Router , 会作为 new Vue 时的参数传递进去
因此只能从这里入手, 而 new Vue({router}) 参数 router 不是 Vue 实例的官方参数, 这样传递的是自定义的参数, 可以通过 Vue 根组件实例的 $option 获取到
Tips:
new Vue的实例就是根组件实例
👇 因为所有组件都可以取到 vue根组件实例 , 也就能取该实例 $options 上实例化后的 router
Vue.component('router-view', {
render(h){
const { router } = this.$root.$options // 根组件上实例化后的 Router
let {current} = router.history // 当前路由信息 响应式数据
// 匹配对应的页面组件并渲染
const {component} = router.routes.find(item=>item.path === current) || {}
console.log('router-view 渲染-->', current,component)
return h(component)
}
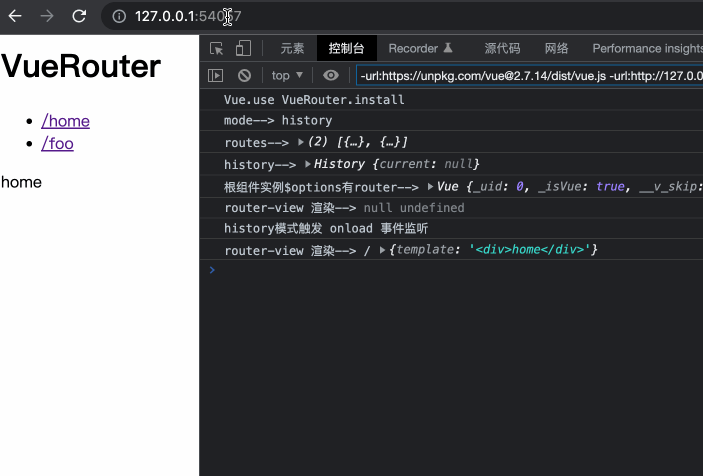
})👆 看上去完美, 运行时发现没有匹配到对应的页面组件, 因为当前路由 current 默认值是 null
❌ 先执行 router-view render 再执行 load 监听回调, 因此 render 还没有重定向到 /
💥 还是要当前路由 current 变化触发 router-view 组件的 render
而 render 函数的触发时机是 内部有响应式数据 或 Props 数据时,数据变化都会触发 render
因此👆 router-view 中的 当前路由路径 或是 路由配置清单 发生变化,就能重新触发 render
👋 我们这里先放下不实现 router-view 的全局注册组件, 去 install 里把实例化后的 Router 变成响应式数据
2. VueRouter install 挂载Vue实例变量
install 中虽然执行时获取不到实例化后的 Router , 但是可以想办法获取到根组件, 再通过它的 $options 获取 实例化后的 Router
利用 Vue实例 的 mixin() 全局往所有 Vue 组件实例的生命周期 beforeCreate 中注入逻辑
用
beforeCreate生命周期 是因为此时vue组件实例的数据data、option就处理好了
这样的思路也可以运用在业务代码中,如给所有vue组件实例挂载东西时
再通过 !!this.$options.router 有值来判断当前是根组件实例
😯 真是大费周折(给所有组件注入东西, 只是为了取出 根组件 并处理)
Vue.mixin 往所有组件中注入生命周期逻辑
Vue.mixin({
	beforeCreate() {
  	if(this.$options?.router) {
			// 有 router 就是根组件
    	this._router = this.$options.router

    	Vue.util.defineReactive(this, "xxx", this._router.history)
  	}
	}
})
👆 defineReactive 的 key 在这里不重要, 只要数据变成响应式就可以触发依赖到它的组件重新触发 render 了
TODO: 相关资料待补
完善 router-view
Vue.component('router-view', {
	render(h){
	  const {_router} = this.$root // 根组件上实例化后的 Router
  	let {current} = _router.history // 当前路由信息 响应式数据
  	// 匹配对应的页面组件并渲染
  	const {component} = _router.routes.find(item=>item.path === current) || {}
	  console.log('router-view 渲染-->', current,component)
  	return h(component)
	}
})
手写 MiniRouter
<html>
<head><title>MiniRouter</title></head>
<body>
  <div id="app"></div>

  <script src="https://unpkg.com/[email protected]/dist/vue.js"></script>
  <!-- <script src="https://unpkg.com/[email protected]/dist/vue-router.js"></script> -->
  <script src="./vue-router.js"></script>

  <script>
    Vue.use(VueRouter)

    const Home = { template: '<div>home</div>' }
    const Foo = { template: '<div>foo</div>' }

    const router = new VueRouter({
      mode: 'history',
      routes: [
        { path: '/', component: Home },
        { path: '/foo', component: Foo },
      ]
    })

    new Vue({
      router,
      template: `
        <div id="app">
          <h1>VueRouter</h1>
          <ul>
            <li><router-link to="/">/home</router-link></li>
            <li><router-link to="/foo">/foo</router-link></li>
          </ul>
          <router-view class="view"></router-view>
        </div>
      `
    }).$mount('#app')
  </script>
</body>
</html>(()=>{
// 存放当前路由信息
class History{
constructor() {
this.current = null
}
}
// new VueRouter 时初始化了对浏览器路由的监听逻辑
class VueRouter{
constructor(options) {
this.mode = options.mode
this.routes = options.routes
this.history = new History()
this.init()
}
init() {
console.log('mode-->', this.mode)
console.log('routes-->', this.routes)
console.log('history-->', this.history)
// 不同路由mode 区分处理浏览器路由逻辑 <-- this
if(this.mode === 'hash') {
// 1. 当前 URL 没有hash时初始化为 #/
!location.hash && (location.hash = "/"); // xxx -> xxx#/
// 2. 当页面加载(首次访问/刷新)时 设置当前路由 history.current 的值
window.addEventListener("load",()=>{
console.log('hash模式触发 onload 事件监听')
this.history.current = location.hash.slice(1)
})
// 3. 监听 hashchange 设置当前路由 history.current 的值
window.addEventListener("hashchange",()=>{
console.log('hash模式触发 hashchange 事件监听')
this.history.current = location.hash.slice(1)
})
return
}
if(this.mode === 'history') {
// 1. 当前 URL 没有路径时初始化为 / 会重定向到静态服务器根路径(应该重定向到项目目录)
!location.pathname && (location.pathname = "/");
// 2. 当页面加载(首次访问/刷新)时 设置当前路由 history.current 的值
window.addEventListener('load',()=>{
console.log('history模式触发 onload 事件监听')
this.history.current = location.pathname
// 4. 遍历现有所有 a标签 绑定点击事件禁用原逻辑
var linkList = document.querySelectorAll('a[href]')
linkList.forEach(el => el.addEventListener('click', (e) => {
e.preventDefault()
// 5. 使用 `History API` 来跳转 `a标签` 上的 `href` 指定页面
history.pushState(null, '', el.getAttribute('href'))
// 调用 `history.pushState()` 或者 `history.replaceState()` 不会触发 `popstate` 事件
this.history.current = location.pathname
}))
})
// 3. 监听 popstate (浏览器后退前进) 设置当前路由 history.current 的值
window.addEventListener("popstate",()=>{
console.log('history模式触发 popstate 事件监听',location.pathname)
this.history.current = location.pathname
})
return
}
console.log(`invalid mode: ${this.mode}`)
}
}
// 把 `vueRouter` 作为 `VuePlugin` 注入 `Vue实例` 时挂载的全局组件/方法
VueRouter.install = function(Vue) {
console.log('Vue.use VueRouter.install')
// install 执行时获取不到实例化后的 Router , 但是可以想办法获取到未来的 Router
Vue.mixin({
beforeCreate() {
if(this.$options?.router) {
console.log('根组件实例$options有router-->', this)
// Vue.prototype.$router = this.$options.router
this._router = this.$options.router
Vue.util.defineReactive(this, "xxx", this._router.history)
}
}
})
// 全局注册组件 `<router-view>`、`<router-link>`
Vue.component('router-link', {
props:{
to:String // 目标路由
},
render(h){
// ❕ 记得 return
return h('a', { attrs: {href: this.to} }, this.$slots.default)
}
})
Vue.component('router-view', {
render(h){
// load 的时候先触发render 此时 URL 没有设置为默认的 / 将匹配不到页面组件
// 还是要 $route 变化触发本组件的 render
const {_router} = this.$root // 根组件上实例化后的 Router
let {current} = _router.history // 当前路由信息 响应式数据
// 匹配对应的页面组件并渲染
const {component} = _router.routes.find(item=>item.path === current) || {}
console.log('router-view 渲染-->', current,component)
return h(component)
}
})
}
window.VueRouter = VueRouter
})()
TODO:
TODO: 要手动记录路由历史栈的场景
🤔 Object.defineProperty 的目的是什么, 普通的赋值不行吗? Vue.$router = this.$root._router
function install(Vue) {
  // 注入 $router $route
  Object.defineProperty(Vue.prototype, '$router', {
    get () { return this.$root._router }
  })

  Object.defineProperty(Vue.prototype, '$route', {
    get () { return this.$root._route }
  })
}